
Last week I presented on three separate occasions during what is considered the biggest Microsoft Data Platform conference of the year, the PASS Summit:
- Full-day pre-conference session
- Speaker Idol panel discussion
- 75-minute general session
On account of the COVID-19 global pandemic going on right now the conference went virtual, which meant a lot of new technical challenges to overcome in a short amount of time. Around two-thirds of speakers were required to pre-record their sessions. I was fortunate in that I did not have to pre-record mine, because I presented on a channel that was being live-streamed and then recorded.
There was a lot of interest on my Twitter thread about the way I set up my environment to live stream my sessions and participate in the panel discussion, so I’ve decided to write about it here for better reach. You are also invited to ask questions in the comments below.
Hardware
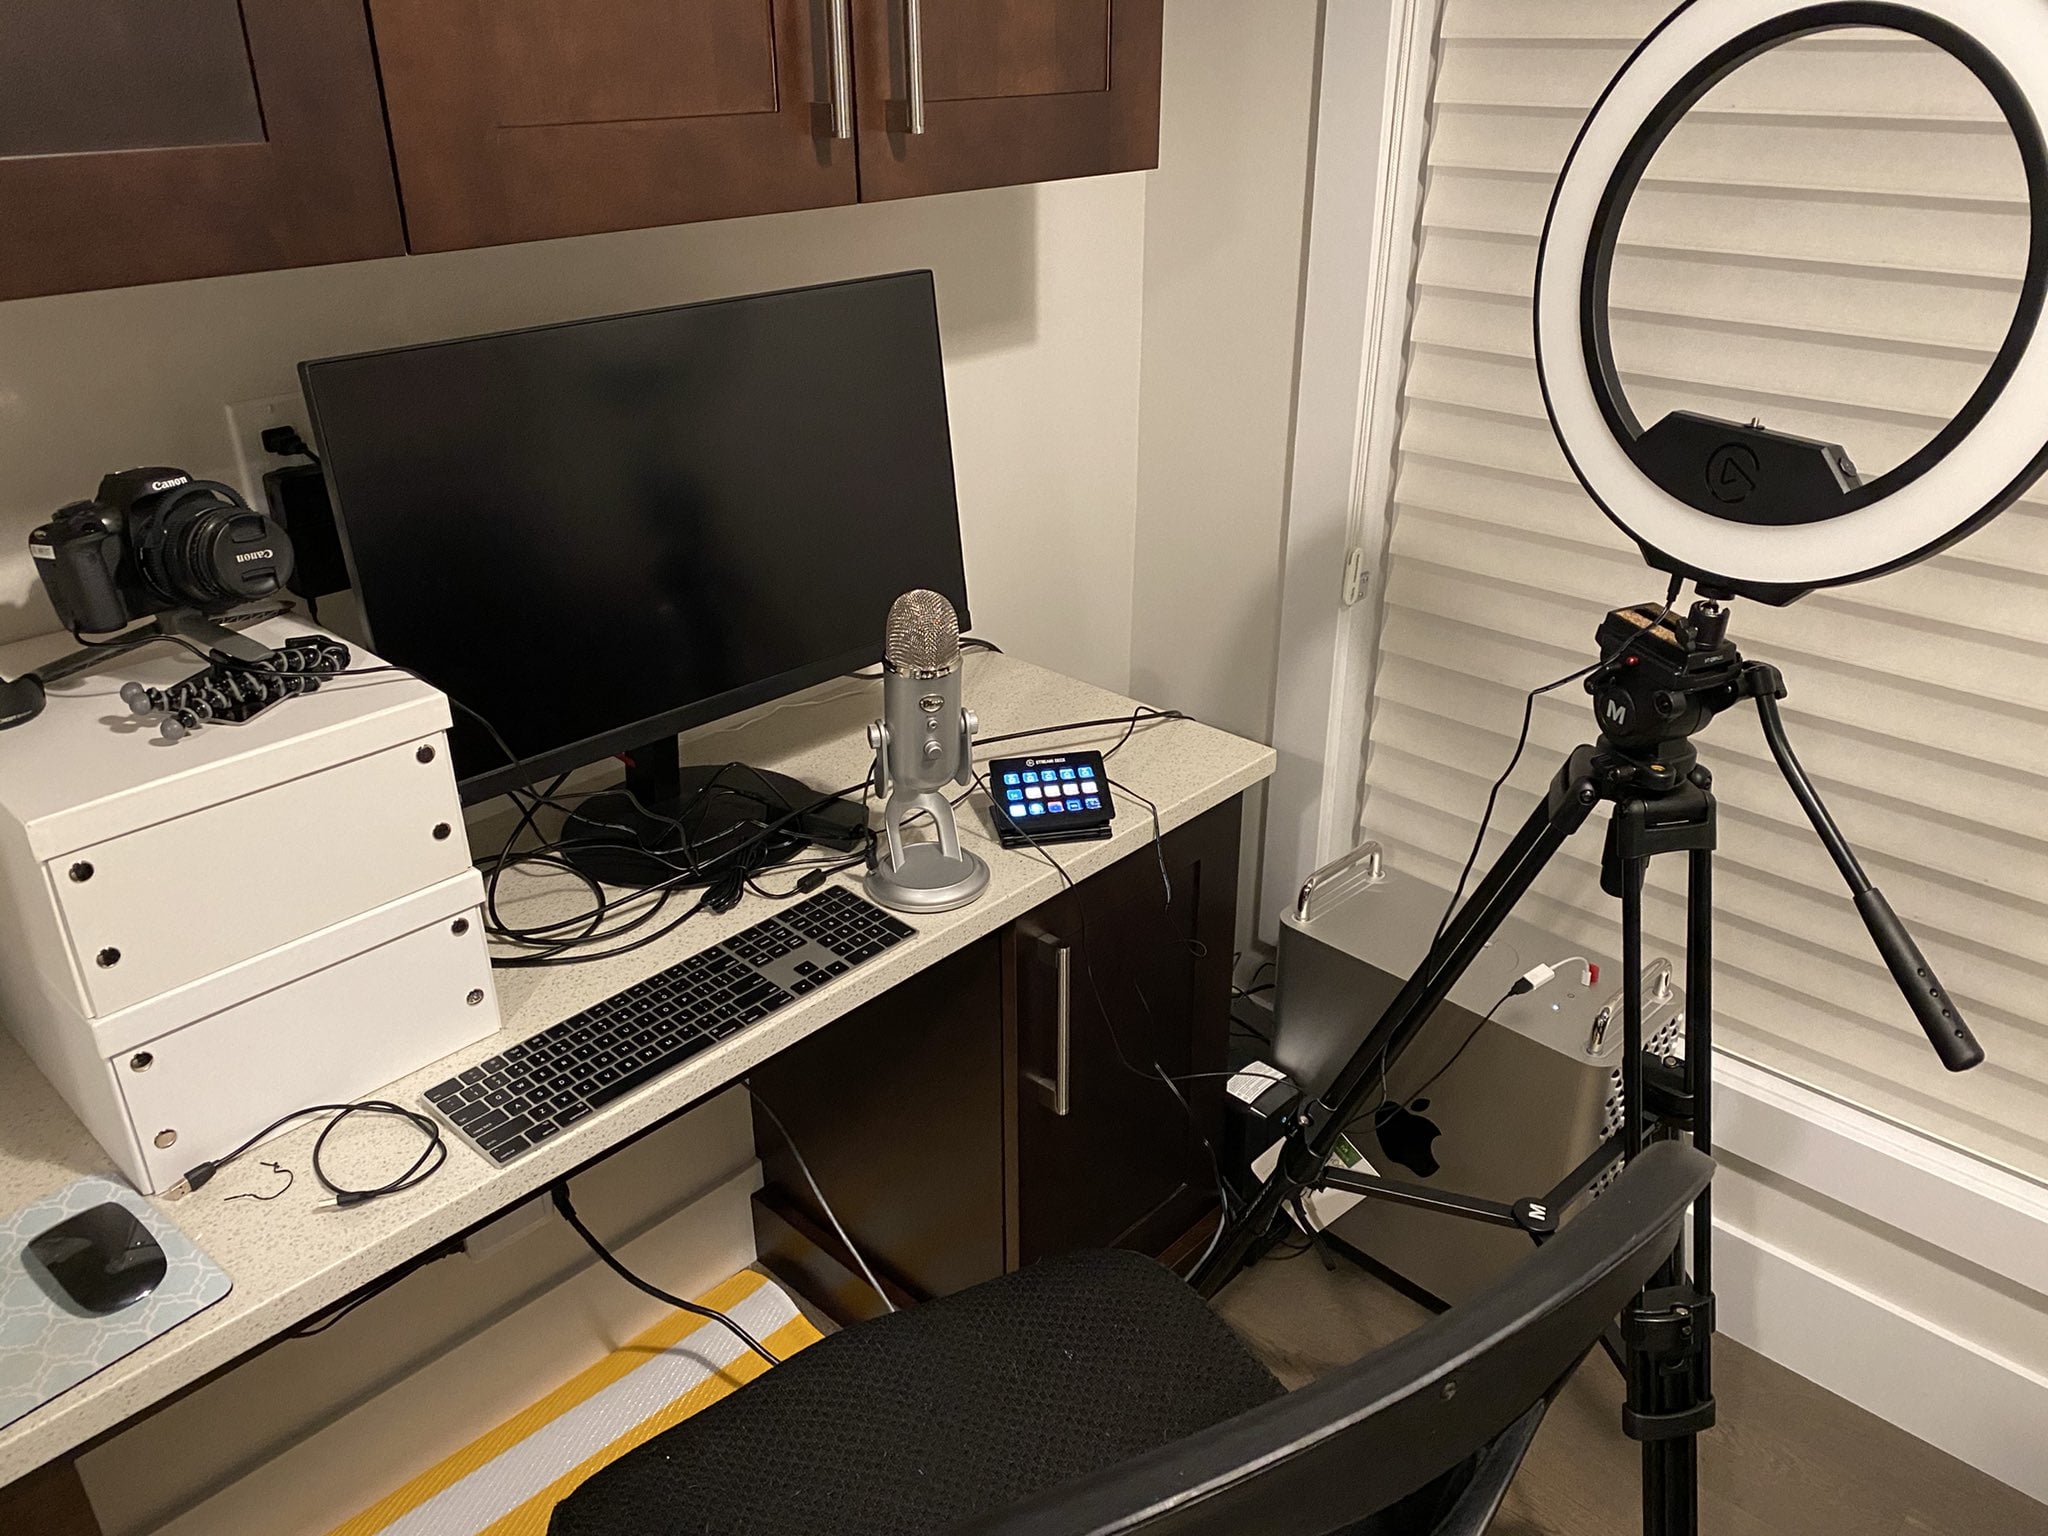
The key to a good virtual presentation is proper sound and lighting, in that order. If you’re mostly doing slides and don’t care too much about your appearance then lighting is less important, but absolutely do make sure you have at least a USB microphone.
This is what I used. Any links are to manufacturer websites for each product (no Amazon referrals here).
- Canon T6i DSLR camera, with the basic zoom lens it comes with.
- Blue Yeti USB microphone. It’s about 10 years old and is still going strong.
- Elgato Cam Link 4K to connect the camera to the computer via USB.
- Elgato Stream Deck for giving me physical programmable buttons to run the whole show.
- Elgato Ring Light for adding a bit of atmosphere, and lighting me properly.
- Mini-HDMI to HDMI cable to connect the camera to the Cam Link 4K.
- A tripod to mount the camera. I used a small one I had in my kit.
- A tripod to mount the ring light. I used my Magnus VT-4000, but any will do.
- A computer to plug this all into. I used both my Mac Pro and MacBook Pro during the week.
Software
Getting the hardware working is only possible with great software tools. For your audio you’ll want a noise gate, which cuts out sound beyond the human vocal range; there are tools that can do this on both Windows and macOS. Here is the software I used:
- Open Broadcaster Software (OBS). I used the original, but I also tested OBS Studio.
- Krisp. A Mac tool which uses machine learning to block background noise.
- Poll Everywhere. A good idea for live polling that fell short because I didn’t pay for it.
- Microsoft PowerPoint, for running the slide show presentation.
- Safari web browser, for a couple of other things I wanted to show.
The last two items might seem obvious, but it’s worth mentioning all the same. I could have easily used Apple’s Keynote instead, which has some really nifty keyboard shortcuts for switching from the slides to the desktop, but none of that was necessary with OBS.
The setup
The PASS Virtual Summit ran off a third-party platform, with input from Zoom. In other words, our input (slides, video, and so on) were streamed from Zoom, captioned by the AI, and streamed from the Summit website.
I ran everything through OBS because it can create a virtual webcam which is recognized by other videoconferencing tools including Zoom and GoToWebinar. Everything I could see in OBS was therefore “ready to go” through whichever streaming platform was needed, plus I had complete control over my presentation with the camera, slides, and demos.
OBS was incredible, especially with the Stream Deck, but had a bit of a learning curve. I watched a few online videos of how to set it up.
I created scenes, which for my pre-con were:
- Full screen camera
- PowerPoint slide show
- PowerPoint + camera
- iTerm2
- TextEdit
- Safari
I then set up each scene so that in the case of demos, my terminal window and text editor were already zoomed in. That meant I didn’t have to worry about text size during the presentation.
Additionally, for the general session, I redid my slides to make the text larger after noticing that the live stream quality wasn’t great.
The Stream Deck has 12 buttons, and I programmed 11 of them for the pre-con. They were programmed to switch to each scene, to control the PowerPoint presentation (first, previous, next, last), and some countdown timers which I forgot to use.
For my general session where I didn’t have any demos, the number of used buttons was reduced, but I kept the scene switching and PowerPoint controls.
The ring light is a tricky beast, mostly because I wasn’t using it in the way it was designed. I had to fiddle with the right brightness and warmth as it reflected off the wall to achieve the correct balance. There was a button for it on the Stream Deck, but I didn’t use it during the sessions.
For the panel discussion I didn’t use OBS at all, because it was something I could do from my laptop. The Yeti microphone was plugged into my laptop and I used the built-in webcam. I put the ring light next to me and rolled with the session directly in Zoom (where I could set a virtual background). Because my Internet was unreliable the whole week (we’re switching to fibre next week), I got booted out of the panel as it started and forgot to unmute myself.
I didn’t run the Yeti through OBS. Originally, I assumed that the visible delay in OBS was what everyone else experienced, but it turns out this is not the case; I just ran the microphone through whichever tool we were using — either Zoom or GoToWebinar — with no noticeable delay for attendees. Each time I used Krisp to block background noise, but there was an incident during the panel where Krisp crashed (beta software) and I cleared my throat while someone was speaking. Sorry, Mr. Hirt.
During the actual presentations, I never had to have PowerPoint running in the foreground. Once I set up OBS to use the output correctly, I could view everything in OBS directly, which meant I could also keep track of the chat and questions that made their way into Zoom and GoToWebinar, and more importantly keep track of the time. Apart from one small error of judgement at the end of the pre-con, I was always on time.
Notes
I have been making independent films for about five years now, both in front of and behind the camera. This meant that I didn’t have to worry about a good camera. That said, I experimented with a number of smartphone apps and I was really impressed with some of them, which would have done in a pinch. Also, I was really impressed with the webcam on my laptop once I lit the scene properly, so as we pointed out during the panel, the tech doesn’t matter as much as the content. Just make sure you have decent sound and good lighting.
I know this post looks like a commercial for Elgato. The reason is that their stuff just works. Yes, there’s a cost premium compared to other products, but when time was short and I asked around, everyone said “Elgato.”
Worth mentioning: no sponsorship here. I bought everything through my company, including Krisp. I should have bought a licence for Poll Everywhere too so that more than 25 people could participate in my online poll.
I could have mounted the camera inside the ring light, but the reflection of the light on my glasses was distracting for the audience and dazzling for me. I elected instead to point the ring light directly at the nearest wall with a full strength but warm light, and used the reflected light, which worked well. I also had natural light on two sides of me which did cause the camera to get confused every so often. If I knew more about ISO settings and had the time to figure it out, I could have fixed the camera to wash out the natural light behind me and just worry about my face. Thankfully I could boost lighting in Zoom itself.
A week before Summit I was invited to participate in a closed beta for Krisp’s new version of their tool, which I found to be even better at blocking background noise including throat clearing, typing, mouse clicks, and — apparently — a fire alarm in my building that went off during my pre-con. The only thing worth noting is that this newer beta uses more CPU for obvious reasons, but this was perfectly reasonable in the circumstances.
Summary
That’s how I made PASS Virtual Summit work for me. Next time we’ll take a look at how we can improve this setup even more, aim toward even better results, as well as talk about how to save an uncompressed audio/video file of your entire session for later rebroadcast. If you have any questions, please feel free to ask in the comments below.
Randolph, do you use the premium version of Krisp? I really enjoyed your Database Administration Through the Ages session.
Thank you! Yes, I paid for the Krisp license.
Thanks for the list of tools and stuff you are using. I am JUST getting into the blogging scene and was planning on doing a few videos as well. One HUGE thing I was lacking was software. After having a few complaints about the sound on my mic on my laptop, bluetooth headset, and wired headset, I opted for a cheap USB Mic. I’ve heard good things about it, but every now and then it comes through too quiet even with the volume cranked. Thinking the problem is related to my laptop having only 2 USB ports and I am using a 7-Port USB hub (windows sees it as 2 4 port USB hubs, so thinking that is how it works on the inside… hub 1 is a 4 port hub with 1 port used to connect to hub 2). Solution to that problem – Equalizer APO (free tool). Use that to boost the gain on the Mic up by 10 Db and now nobody complains. Well, they may complain if I ever buy a power adapter for the USB Hub…
But hardware was all in place, but I had no clue on software. Downloading all of your recommendations now as I see both OBS and Krisp support Windows! Then need to write a few blogs and prep a few videos and get my blog live.
Thanks for your feedback Brian. One thing I’d advise is (if possible) don’t use a USB hub for audio devices, and plug directly into the machine. Of course with two ports you’re limited, so I understand.
Comments are closed.