My user group, the Calgary Data User Group, has been recording videos since April of this year, so at the time of this writing we have just two videos on our YouTube channel. As one of the Azure Data Tech Groups we have access to Microsoft Teams, and in there we can display live captions during the session itself, however these are not recorded with the video (and if they are, I haven’t figured that out yet).
Read Meagan Longoria’s post Captioning options for your online conference to understand the different kinds of captions.
When editing a video and before posting it on YouTube, I run the recorded audio through a third-party captioning tool called otter.ai, recommended to me by Meagan. As I noted, I’ve only done two videos so far. The first took much longer than expected because of having to get used to a new tool, but I have a more streamlined process after the second one at least.
I use a MacBook Pro as my main computer, with two applications to accomplish this: Final Cut Pro (a video editing application) and Logic Pro (an audio editing application). Generally speaking, I wouldn’t need to open up the audio separately, but in my first video the audio track in the MP4 was corrupt and I had to export the audio to its own track before importing it again into Final Cut Pro.
Based on previous experience with editing film, I always do a rough video edit before the audio edit, because then I know which audio we’re going to use. In this context, it means I know exactly which audio needs to be captioned. I then export this audio as a WAV file. While I could easily export the audio in MP3 format, a WAV file is uncompressed and with a Microsoft Teams recording not having the greatest audio to begin with, I want to give the captioning tool the best possible sound to process.
The processing takes anywhere from 20 to 60 minutes depending on the length, so I don’t count this as part of the process because I can keep myself busy in other ways by cleaning up the video, levelling the audio, and so on.
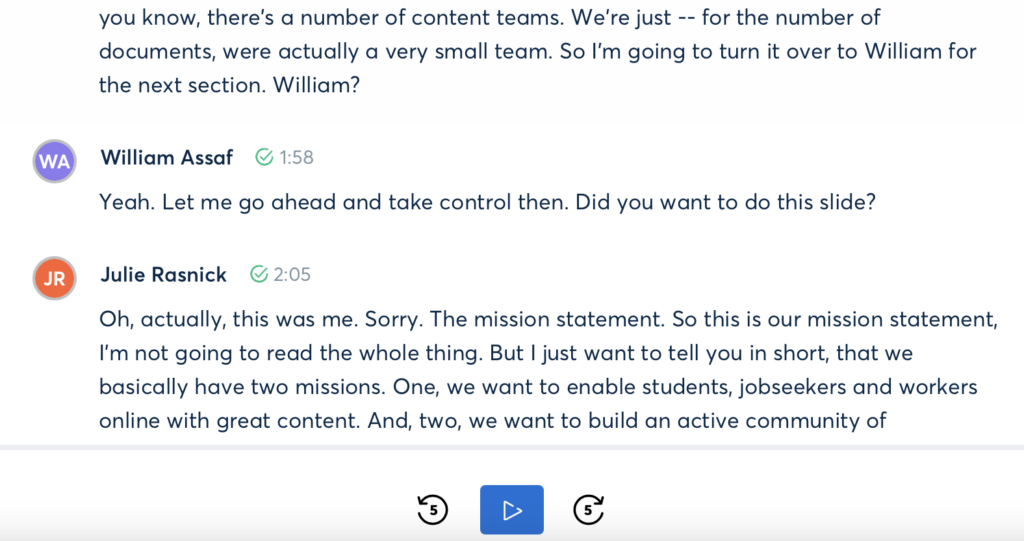
The user interface on otter.ai is quite simple. Because it runs in a browser, you are shown the caption text as well as various controls for playback speed, editing of the text itself, and assigning speaker names to the captions (useful for multiple presenters, or Q&A style scenarios).
As you can see in the image below — taken from the second video I did — William Assaf and Julie Rasnick’s names are assigned (by me) to each portion of their text. I chose this section because it demonstrates how otter.ai can differentiate between two speakers. Note the time stamps (in minutes and seconds since the beginning of the recording) beside each speaker. You can also see the playback and seek buttons at the bottom.
One thing I learned from my first video is to try and break up the text into smaller chunks. Behind the scenes, each word has a timestamp which links it to the audio file, but it can get confused on longer videos especially during a technical demo. If it loses synchronization with the audio, you’ll want that to affect only a smaller portion (the unsynchronized portion will need manual adjustment of the time stamps in the export file later).
Otter.ai is just software so it’s not perfect. It’s very good at some accents, and not very good at others. Another problem is how it handles jargon, so you’re able to store various words or phrases in a separate dictionary, though I haven’t had much use for this feature as I type really fast.
Using the playback options I listen to each sentence, one sentence at a time, at 1x speed. I did the first video at 1.25x but I found it made no practical difference: generally speaking, the whole process of checking the captions took twice as long as the length of the audio. If there are edits to be made, I follow a technique I developed when working with word processing software which is quite handy even today in Microsoft Word.
Let’s say the phrase in the captions is supposed to be “Azure Docs,” but is transcribed as “as you’re ducks.” I place the cursor between the “a” and “s” in “as” and type “Az” rendering “aAzs” and then delete the “a” and “s”. This makes sure the time code associated with that word is retained. I can then convert “you’re” into “yzu’re” then remove the “y” and the apostrophe. Once that’s done, I remove the space between them, and during playback it retains the time code perfectly1How does this apply to word processing? In Word for example, when you’re dealing with an existing document you want to retain the existing formatting, so it’s much easier to go somewhere inside an existing word and add text, then remove the old text. This prevents the word processing software from accidentally “fixing” the fonts or layouts.. If I simply replaced the incorrect transcription by typing over it, the time code has a good chance of being removed, and that’s where I ran into problems with my first video.
Because otter.ai is pretty good and seems to be getting better as more people use it (thereby training the machine learning algorithm), I’d say most of my time is spent correcting noise words, like “um” and “you know.” Then, of course, correcting the jargon words which are quite prevalent in our industry. Fortunately, it’s good at things like “SQL.”
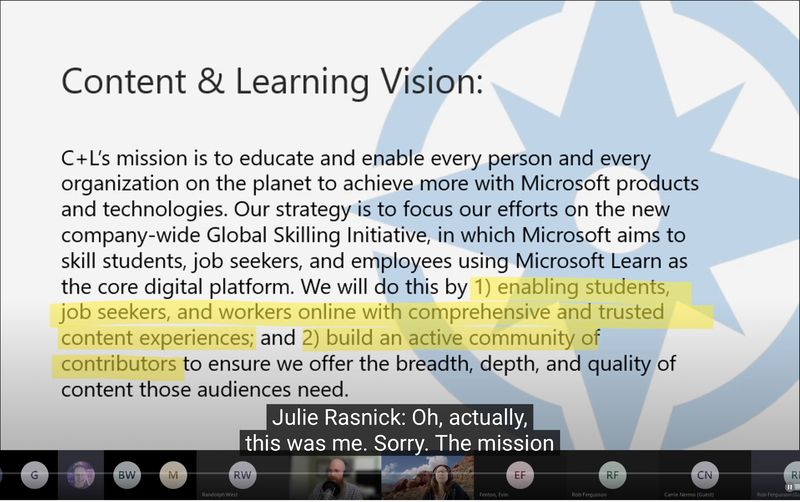
Once the captions are complete, I export the transcript as an SRT file, because that’s the format YouTube uses. I pick the default settings of 30 characters per line and two lines at a time, which displays quite well on YouTube as you can see below. Note that because the speaker has changed, their name is shown where they begin to speak.
Unless something goes wrong with the synchronization and I have to modify the time stamps, the SRT import is very quick on YouTube’s side, and after it processes the video I do a quick random check that the words are in sync.
I hope this has been useful. While there are other tools out there including YouTube itself, I found otter.ai to be exactly what I needed.
Share your tips and tricks below in the comments.
Photo by Immo Wegmann on Unsplash.